专注系统运维、网络架构,研究技术凯发app官方网站的解决方案,记录我的思想轨迹、工作学习、生活和关注的领域
- ·
- ·
- ·
- ·
- ·
- ·
- ·
- ·
- ·
- ·
分类: mysql/postgresql
2013-01-25 16:48:22
承上一篇文章:“mysql之master-master配置 ”已经实现了mysql双主模式,即互相备份。接下来我们用keepavlied来实现单点故障切换。
一、配置虚拟ip-vip
首先我们先配置vip节点ip地址,把每台物理地址执行到虚拟ip。
这里我们使用的虚拟ip-vip为: 192.168.15.181
#vim /etc/sysconfig/network-scripts/ifcfg-eth0:0
device=eth0:0
ipaddr=192.168.15.181
# ip addr
1: lo:
link/loopback 00:00:00:00:00:00 brd 00:00:00:00:00:00
inet 127.0.0.1/8 scope host lo
inet6 ::1/128 scope host
valid_lft forever preferred_lft forever
2: eth0:
link/ether 00:0c:29:d8:b3:ca brd ff:ff:ff:ff:ff:ff
inet 192.168.15.178/24 brd 192.168.15.255 scope global eth0
inet 192.168.15.181/32 scope global eth0
inet 192.168.15.181/24 brd 192.168.15.255 scope global secondary eth0:0
inet6 fe80::20c:29ff:fed8:b3ca/64 scope link
valid_lft forever preferred_lft forever
3: sit0:
link/sit 0.0.0.0 brd 0.0.0.0
二、安装配置keepalived
凯发k8官网下载客户端中心官网下载地址:
1)安装:
#wget
#tar -zxvf keepalived-1.2.7.tar.gz
#cd keepalived-1.2.7
#./configure --prefix=/usr/local/keepalived --with-kernel-dir=/usr/src/kernels/2.6.18-128.el5-x86_64/ #kernel目录根据实际修改。
预编译后出现:
keepalived configuration
------------------------
keepalived version : 1.2.7
compiler : gcc
compiler flags : -g -o2 -dethertype_ipv6=0x86dd
extra lib : -lpopt -lssl -lcrypto
use ipvs framework : yes
ipvs sync daemon support : yes
ipvs use libnl : no
use vrrp framework : yes
use vrrp vmac : no
snmp support : no
use debug flags : no
注意如果你没有用到lvs可以把lvs去掉即 --disable-lvs-syncd --disable-lvs
#make && make install
整理管理文件:
#cp /usr/local/keepalived/sbin/keepalived /usr/sbin/
#cp /usr/local/keepalived/etc/sysconfig/keepalived /etc/sysconfig/
#cp /usr/local/keepalived/etc/rc.d/init.d/keepalived /etc/init.d/
建立配置文件目录(注意:keepalived的配置文件默认在/etc/keepalived/目录)
#mkdir /etc/keepalived
两台服务器(两个节点)都这样安装即可
2)配置
关于配置文件的说明,可以详见这里:
节点a192.168.15.178配置如下:
#vim /etc/keepalived/keepalived.conf
global_defs {
notification_email
{
roc@example.com
}
notification_email_from roc@example.com
smtp_server 127.0.0.1
stmp_connect_timeout 30
router_id mysql-ha
}
vrrp_script chk_mysql {
script "killall -0 mysqld" #检测mysqld进程,也可以替换成检测脚本
interval 5
}
vrrp_instance vi_1 {
state master #从库配置此处均是slave
interface eth0
virtual_router_id 51
priority 100 #优先级,另一台改为90
advert_int 1
nopreempt #不抢占,只在优先级高的机器上设置即可,优先级低的机器不设置
authentication {
auth_type pass
auth_pass 1111
}
virtual_ipaddress {
192.168.15.181
}
track_script {
chk_mysql #执行上面的命令
}
}
virtual_server 192.168.15.181 3306 {
delay_loop 6
lb_algo wcl
lb_kind dr
#nat_mask 255.255.255.0
persistence_timeout 50
protocol tcp
real_server 192.168.15.178 3306 {
weight 1
tcp_check {
connect_timeout 10 #(10秒无响应超时)
nb_get_retry 3
delay_before_retry 3
connect_port 3306
}
}
real_server 10.8.10.185 3306 {
weight 1
tcp_check {
connect_timeout 10 #(10秒无响应超时)
nb_get_retry 3
delay_before_retry 3
connect_port 3306
}
}
}
节点192.168.15.185配置如下:
#vim /etc/keepalived/keepalived.conf
global_defs {
notification_email
{
roc@example.com
}
notification_email_from roc@example.com
smtp_server 127.0.0.1
stmp_connect_timeout 30
router_id mysql-ha
}
vrrp_script chk_mysql {
script "killall -0 mysqld" #检测mysqld进程,也可以替换成检测脚本
interval 5
}
vrrp_instance vi_1 {
state slave #主库配置此处均是master
interface eth0
virtual_router_id 51
priority 90
advert_int 1
authentication {
auth_type pass
auth_pass 1111
}
virtual_ipaddress {
192.168.15.181
}
track_script {
chk_mysql #执行上面的命令
}
}
virtual_server 192.168.15.181 3306 {
delay_loop 6
lb_algo wcl
lb_kind dr
#nat_mask 255.255.255.0
persistence_timeout 50
protocol tcp
real_server 192.168.15.178 3306 {
weight 1
tcp_check {
connect_timeout 10 #(10秒无响应超时)
nb_get_retry 3
delay_before_retry 3
connect_port 3306
}
}
real_server 10.8.10.185 3306 {
weight 1
tcp_check {
connect_timeout 10 #(10秒无响应超时)
nb_get_retry 3
delay_before_retry 3
connect_port 3306
}
}
}
3)开启服务
#/usr/local/keepalived/sbin/keepalived -d
#ps -aux | grep keepalived
root 15416 0.0 0.0 61148 736 pts/1 s 16:43 0:00 grep keepalived
root 31121 0.0 0.0 35832 492 ? ss jan22 0:00 keepalived -d
root 31122 0.0 0.0 37924 1372 ? s jan22 0:00 keepalived -d
root 31125 0.0 0.0 37924 1000 ? s jan22 0:03 keepalived -d
三、测试
mysql远程登录测试
客户端登录vip,看是否能登录,在登录之两台mysql服务器都要授权允许从远程登录
mysql> grant all privileges on phpcmsv9.* to 'dbuser_do'@'192.168.10.6' identified by '123456';
no connection. trying to reconnect...
connection id: 1168
current database: phpcmsv9
query ok, 0 rows affected (0.11 sec)
mysql> flush privileges;
query ok, 0 rows affected (0.00 sec)
客户端登录结果:

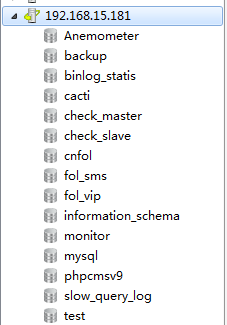
此时查询的是192.168.15.185的数据库信息,关闭192.168.15.185 mysql,继续联系数据库。
此时连接的是192.168.15.178的数据库。
keepavlied完成后,接下来要测试的就是如果让master服务器和slave 也能够实现自动切换,同步保证数据同步正常。